This tutorial shows how to use the Aurora scheduler to run (and
“printf-debug”) a hello world program on Mesos. The operational
hierarchy is:
This is the recommended first Aurora users document to read to start getting up to speed on the system.
To get help, email questions to the Aurora Developer List, dev@aurora.apache.org
You use the Aurora client and web UI to interact with Aurora jobs. To install it locally, see vagrant.md. The remainder of this Tutorial assumes you are running Aurora using Vagrant. Unless otherwise stated, all commands are to be run from the root of the aurora repository clone.
Our “hello world” application is a simple Python script that loops
forever, displaying the time every few seconds. Copy the code below and
put it in a file named hello_world.py in the root of your Aurora repository clone (Note:
this directory is the same as /vagrant inside the Vagrant VMs).
The script has an intentional bug, which we will explain later on.
import sys
import time

def main(argv):
  SLEEP_DELAY = 10
  # Python ninjas - ignore this blatant bug.
  for i in xrang(100):
    print("Hello world! The time is now: %s. Sleeping for %d secs" % (
      time.asctime(), SLEEP_DELAY))
    sys.stdout.flush()
    time.sleep(SLEEP_DELAY)

if __name__ == "__main__":
  main(sys.argv)
Once we have our script/program, we need to create a configuration
file that tells Aurora how to manage and launch our Job. Save the below
code in the file hello_world.aurora.
pkg_path = '/vagrant/hello_world.py'

# we use a trick here to make the configuration change with
# the contents of the file, for simplicity.  in a normal setting, packages would be
# versioned, and the version number would be changed in the configuration.
import hashlib
with open(pkg_path, 'rb') as f:
  pkg_checksum = hashlib.md5(f.read()).hexdigest()

# copy hello_world.py into the local sandbox
install = Process(
  name = 'fetch_package',
  cmdline = 'cp %s . && echo %s && chmod +x hello_world.py' % (pkg_path, pkg_checksum))

# run the script
hello_world = Process(
  name = 'hello_world',
  cmdline = 'python hello_world.py')

# describe the task
hello_world_task = SequentialTask(
  processes = [install, hello_world],
  resources = Resources(cpu = 1, ram = 1*MB, disk=8*MB))

jobs = [
  Service(cluster = 'devcluster',
          environment = 'devel',
          role = 'www-data',
          name = 'hello_world',
          task = hello_world_task)
]
For more about Aurora configuration files, see the Configuration Tutorial and the Aurora + Thermos Reference (preferably after finishing this tutorial).
More than you might think.
From a “big picture” viewpoint, it first defines two Processes. Then it defines a Task that runs the two Processes in the order specified in the Task definition, as well as specifying what computational and memory resources are available for them. Finally, it defines a Job that will schedule the Task on available and suitable machines. This Job is the sole member of a list of Jobs; you can specify more than one Job in a config file.
At the Process level, it specifies how to get your code into the local sandbox in which it will run. It then specifies how the code is actually run once the second Process starts.
We’re ready to launch our job! To do so, we use the Aurora Client to issue a Job creation request to the Aurora scheduler.
Many Aurora Client commands take a job key argument, which uniquely
identifies a Job. A job key consists of four parts, each separated by a
“/”. The four parts are <cluster>/<role>/<environment>/<jobname>
in that order. When comparing two job keys, if any of the
four parts is different from its counterpart in the other key, then the
two job keys identify two separate jobs. If all four values are
identical, the job keys identify the same job.
/etc/aurora/clusters.json within the Aurora scheduler has the available
cluster names. For Vagrant, from the top-level of your Aurora repository clone,
do:
$ vagrant ssh
Followed by:
vagrant@precise64:~$ cat /etc/aurora/clusters.json
You’ll see something like:
[{
  "name": "devcluster",
  "zk": "192.168.33.7",
  "scheduler_zk_path": "/aurora/scheduler",
  "auth_mechanism": "UNAUTHENTICATED"
}]
Use a name value for your job key’s cluster value.
Role names are user accounts existing on the slave machines. If you don’t know what accounts are available, contact your sysadmin.
Environment names are namespaces; you can count on prod, devel and test existing.
The Aurora Client command that actually runs our Job is aurora job create. It creates a Job as
specified by its job key and configuration file arguments and runs it.
aurora job create <cluster>/<role>/<environment>/<jobname> <config_file>
Or for our example:
aurora job create devcluster/www-data/devel/hello_world /vagrant/hello_world.aurora
This returns:
$ vagrant ssh
Welcome to Ubuntu 12.04 LTS (GNU/Linux 3.2.0-23-generic x86_64)

 * Documentation:  https://help.ubuntu.com/
Welcome to your Vagrant-built virtual machine.
Last login: Fri Jan  3 02:18:55 2014 from 10.0.2.2
vagrant@precise64:~$ aurora job create devcluster/www-data/devel/hello_world \
    /vagrant/hello_world.aurora
 INFO] Creating job hello_world
 INFO] Response from scheduler: OK (message: 1 new tasks pending for job
  www-data/devel/hello_world)
 INFO] Job url: http://precise64:8081/scheduler/www-data/devel/hello_world
Now that our job is running, let’s see what it’s doing. Access the
scheduler web interface at http://$scheduler_hostname:$scheduler_port/scheduler
Or when using vagrant, http://192.168.33.7:8081/scheduler
First we see what Jobs are scheduled:
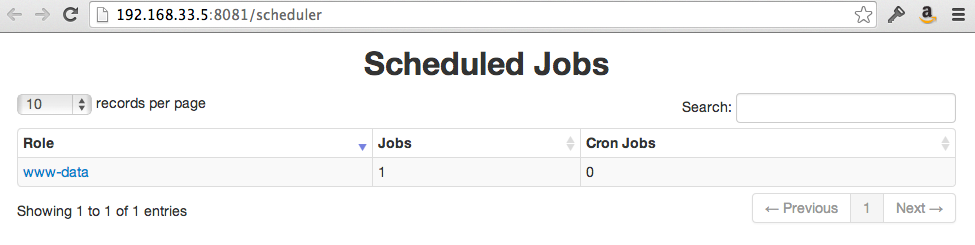
Click on your user name, which in this case was www-data, and we see the Jobs associated
with that role:
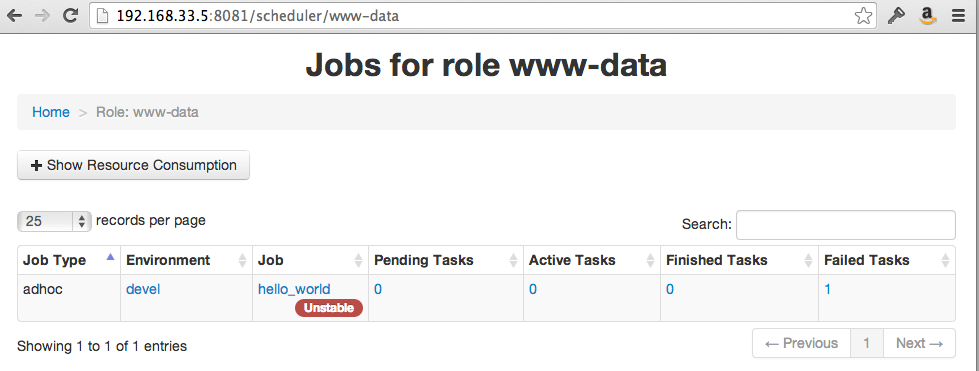
If you click on your hello_world Job, you’ll see:

Oops, looks like our first job didn’t quite work! The task failed, so we have to figure out what went wrong.
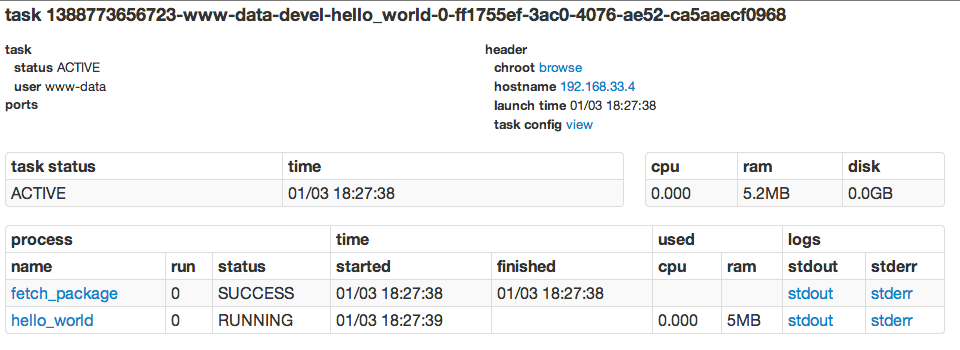
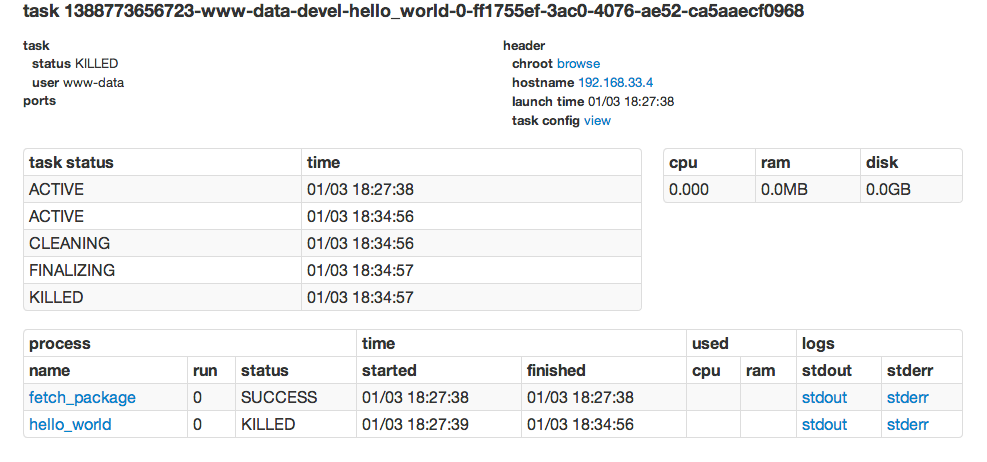
Access the page for our Task by clicking on its host.

Once there, we see that the
hello_world process failed. The Task page captures the standard error and
standard output streams and makes them available. Clicking through
to stderr on the failed hello_world process, we see what happened.
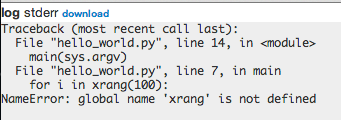
It looks like we made a typo in our Python script. We wanted xrange,
not xrang. Edit the hello_world.py script to use the correct function and
we will try again.
aurora update start devcluster/www-data/devel/hello_world /vagrant/hello_world.aurora
This time, the task comes up, we inspect the page, and see that the
hello_world process is running.
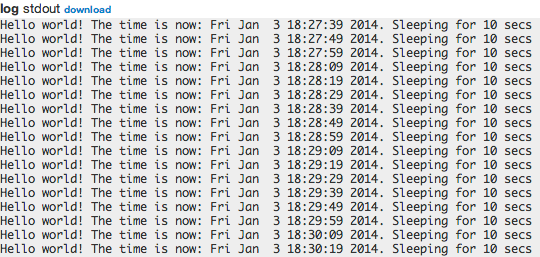
We then inspect the output by clicking on stdout and see our process’
output:
Now that we’re done, we kill the job using the Aurora client:
vagrant@precise64:~$ aurora job killall devcluster/www-data/devel/hello_world
 INFO] Killing tasks for job: devcluster/www-data/devel/hello_world
 INFO] Response from scheduler: OK (message: Tasks killed.)
 INFO] Job url: http://precise64:8081/scheduler/www-data/devel/hello_world
vagrant@precise64:~$
The job page now shows the hello_world tasks as completed.
Now that you’ve finished this Tutorial, you should read or do the following:
aurora -h, and read the
Aurora Client Commands document.